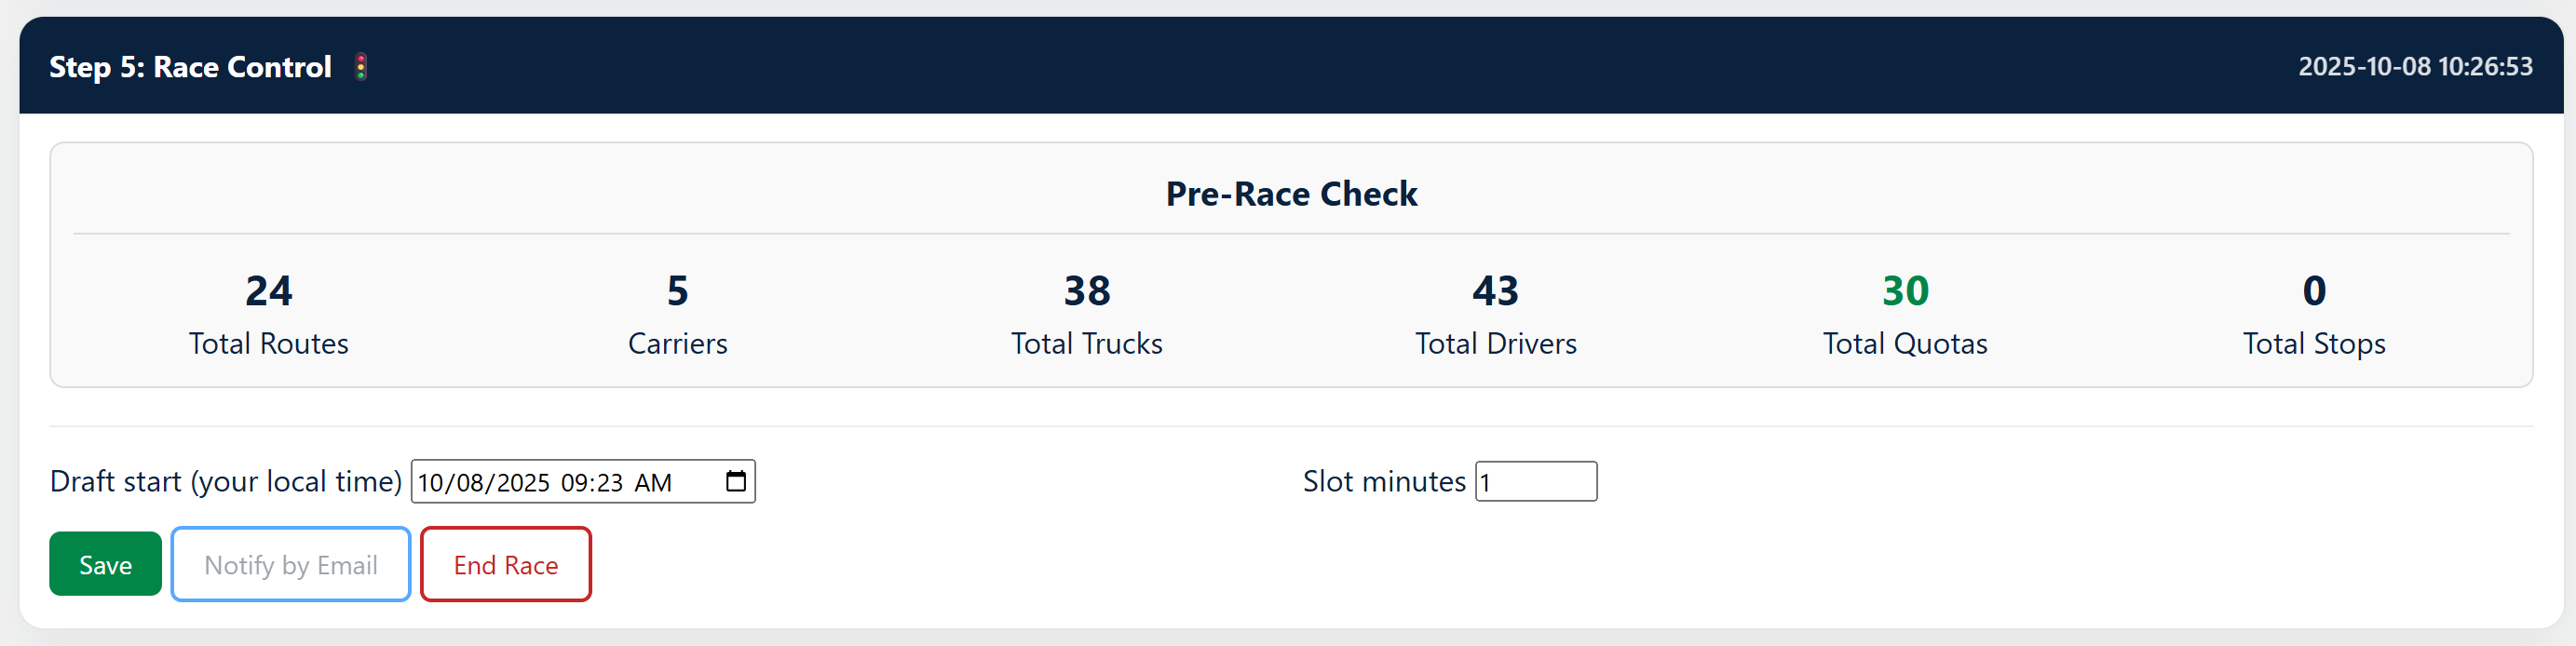
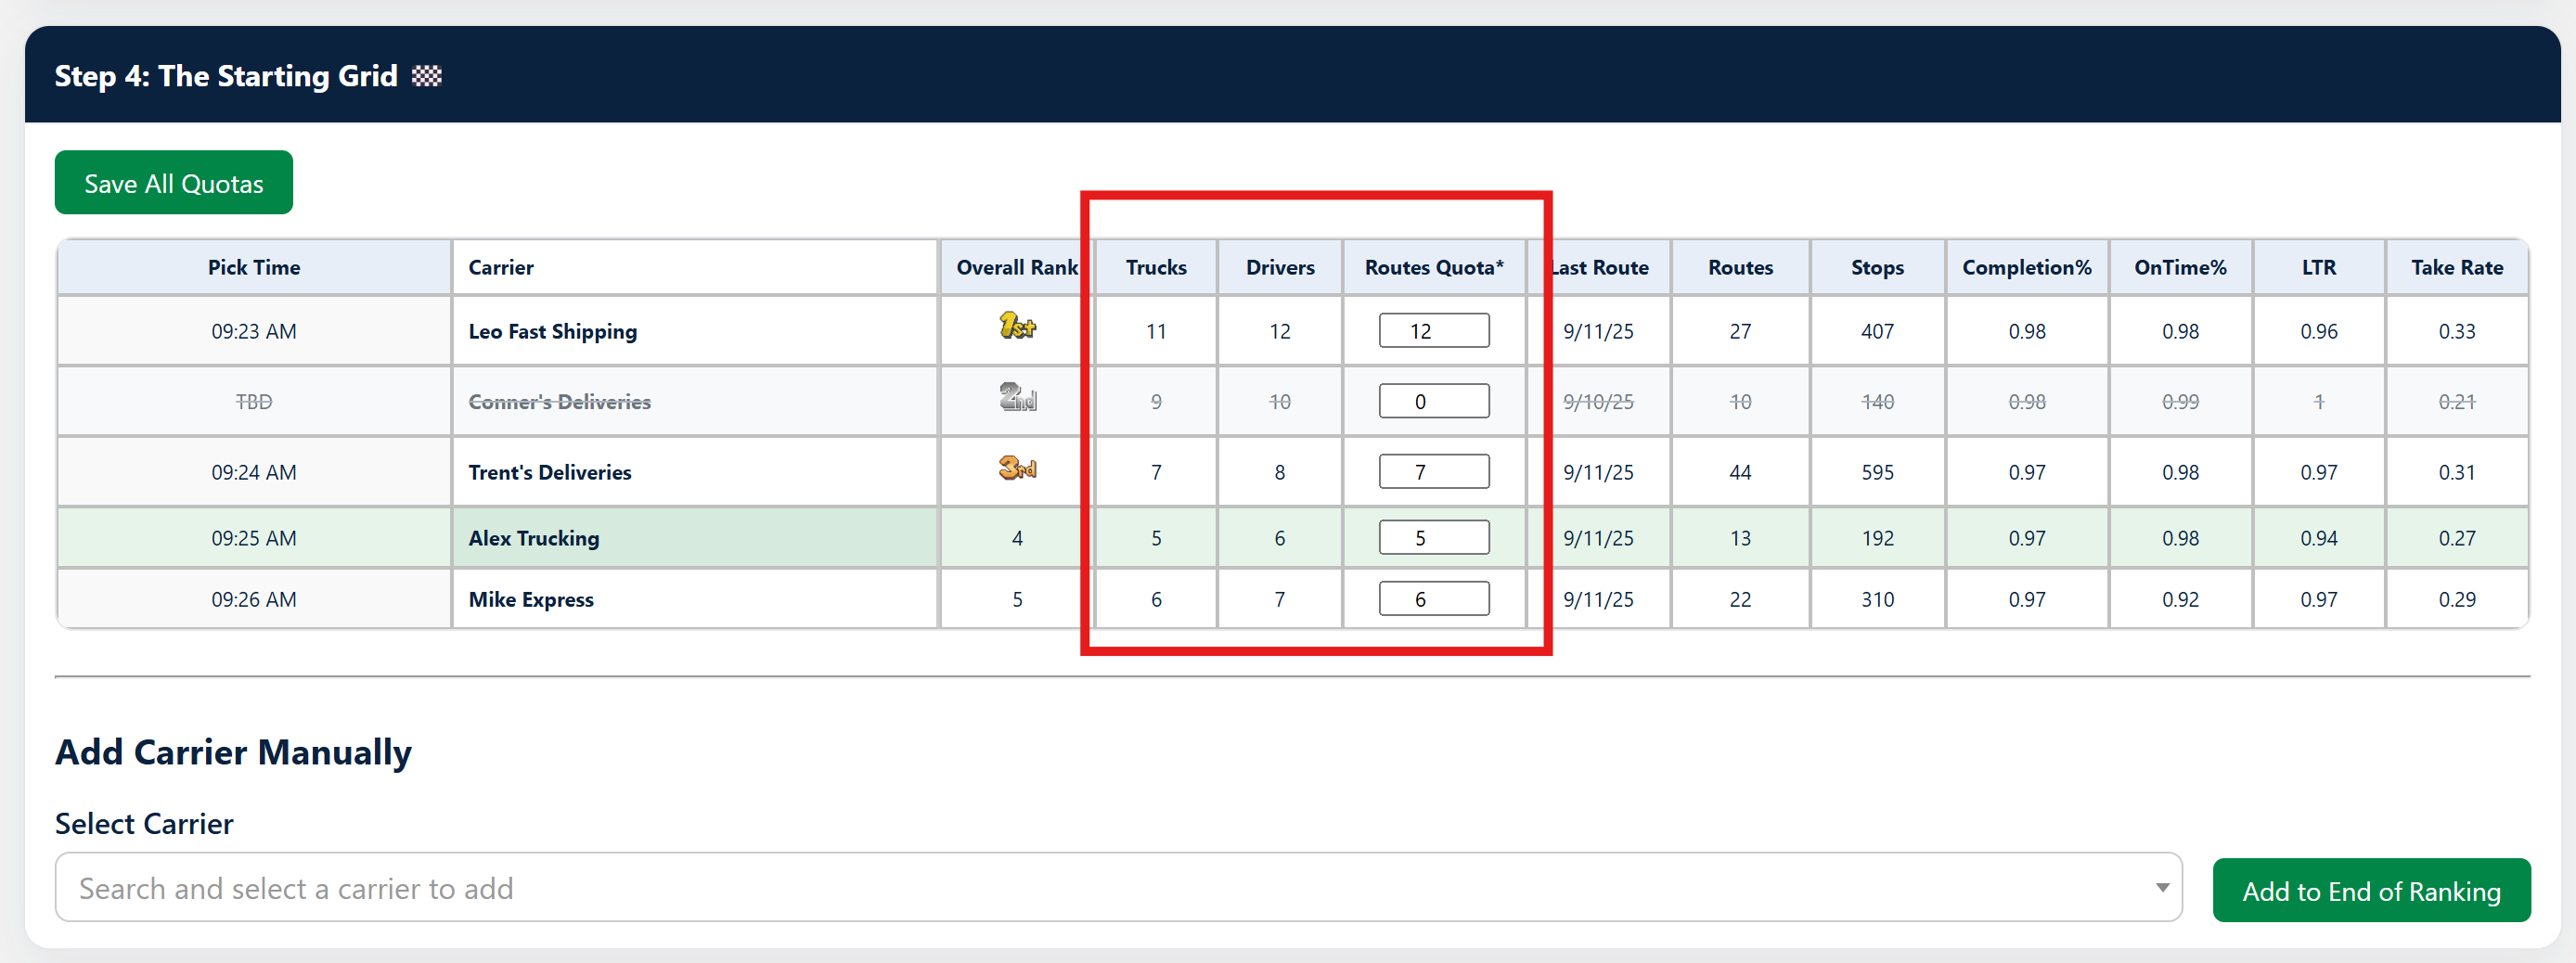
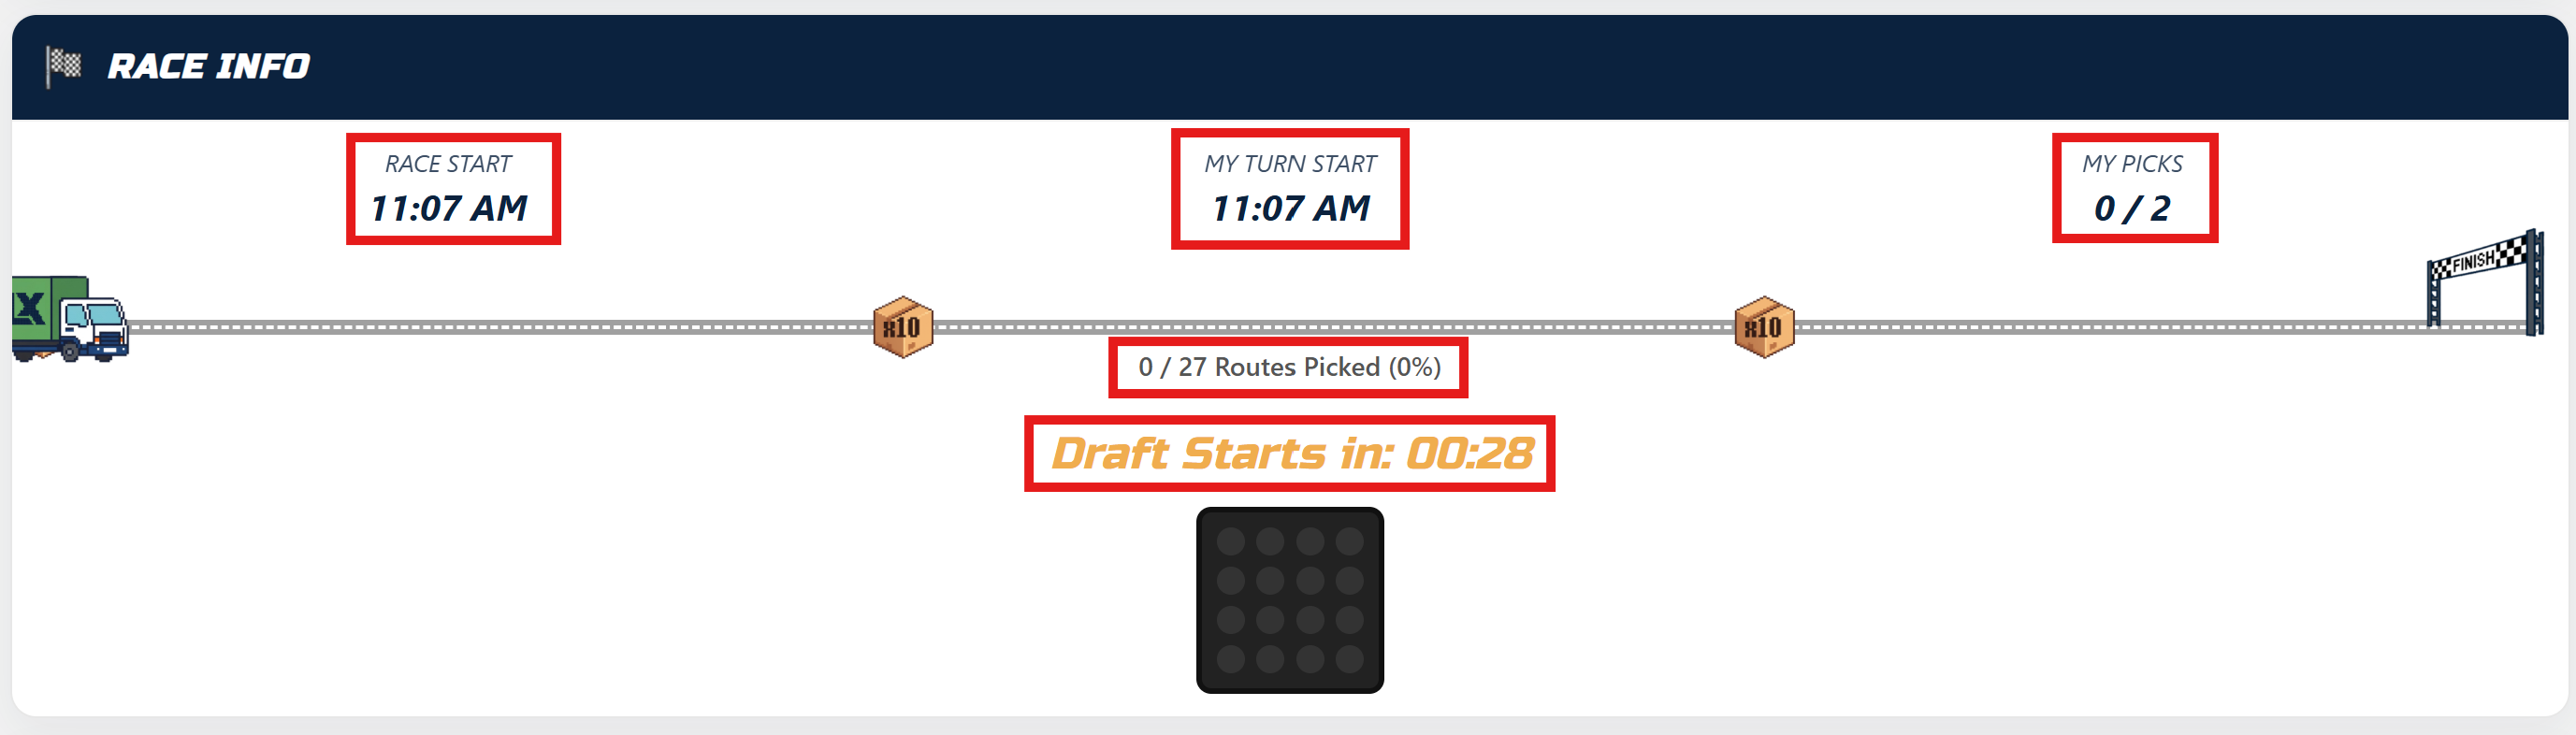
RLX Logo

Route Draft – How-To Guide

Exporting Carrier Ranking from Power BI

  1. In the app’s top bar, click “Ranking” to open the Power BI dashboard.
  2. Go to Carrier Details.
    Carrier Details view
  3. Filter the Date Range (usually last 4 days).
    Date filter
  4. Select your Profit Center and wait for the table to update.
    PC filter
  5. Open the table menu () and choose Export data.
    Export data
  6. Download as .xlsx or .csv. Don’t change header names.
Tip: If your file headers differ slightly (e.g., “Carrier Name”), the app can interpret them. If they’re missing entirely, the upload will explain what’s wrong.

PC Route Draft Walkthrough (Admin)

  1. Start Fresh (Important!)
    Before starting a new draft for the day, go to the "Step 0" card and click the Reset Draft button. This clears all of yesterday's data and ensures a clean slate for the new draft.
  2. Upload Manifest
    In the "Step 1" card, upload today’s routes file (.xlsx or .csv). The file must contain a unique Route ID column. Upload manifest
  3. Upload Carrier Rankings
    In the "Step 2" card, upload the Power BI export for your PC. The app validates the headers and links carriers automatically. Upload ranking file
  4. Manage Routes & Visibility
    In the "Step 3" card, you can perform two actions:
      Add PC Notes or Delete Routes: Use the table to add notes for carriers or select and delete routes that were cancelled. Click Save Notes when done. Set Column Visibility: In the bottom half, uncheck any columns you want to hide from carriers during the draft and click Save Visibility.
    Routes and notes
  5. Set Quotas & Add Carriers
    In the "Step 4" card ("The Starting Grid"), your primary task is to set the Routes Quota* for each carrier and click Save All Quotas. If a carrier is missing from the ranking file, you can add them manually at the bottom of this same card. Starting grid
  6. Schedule the Draft
    In the "Step 5" card ("Race Control"), set the draft's local start time and the slot minutes for each carrier's turn. Click Save for a scheduled start, or Start Now to begin immediately. A pop-up will confirm that the settings were saved. Race control
  7. Monitor & Finalize
    Monitor progress in the "Scoreboard" (Step 6) and "Race Results" (Step 7) sections. Once all routes are picked, go to the "Race Control" card and click the End Race button to formally close the draft. Afterwards, use Export Today's Results to download the final report. Export results

Carrier Route Draft Walkthrough

  1. Home → Select Profit Center & Login
    Pick the PC you are drafting for, then choose Carrier Login and enter your unique Carrier Key. Carrier login
  2. Draft Lobby & Status
    Your dashboard shows your rank, your time slot, and your pick quota. A large timer will count down to your turn. The page will auto-update and alert you when it's your turn to pick. Carrier lobby
  3. Select Routes & Assign Drivers
    When it's your turn, the checkboxes in the "Available Routes" table become active. Select routes up to your remaining quota. After checking a box, a popup will appear allowing you to optionally assign a driver to that route. Available routes
  4. Submit Selection
    Once you have made your selections, click the Submit Selection button. A confetti animation will confirm your submission.
  5. Confirm Your Picks
    Always check the "My Picks" table to ensure your selected routes appear there. This is your final confirmation. If you have reached your quota, your draft is complete. My picks

Client Guides

Choose a client below to see their manifest specifics and example screenshots.
  1. Open Lowe’s manifest template. Verify required columns (Route ID, stops, time windows, etc.).
    Lowe's example
  2. Clean duplicates, ensure consistent types (dates, numbers), save as .xlsx or .csv.
  3. Upload in Step 1 on the PC Dashboard.
  1. Use GE manifest layout. Confirm Route ID and stop metrics are present.
    GE example
  2. Normalize date/time columns; remove totals rows.
  3. Upload in Step 1 on the PC Dashboard.
  1. Open The Home Depot manifest. Validate headers and unique Route ID.
    HD example
  2. Check numeric fields (stops, miles, duration) for consistency.
  3. Upload in Step 1 on the PC Dashboard.
  1. Open Morris Furniture manifest. Confirm required fields and Route ID uniqueness.
    Morris example
  2. Fix any header typos; ensure CSV/XLSX encoding is UTF-8.
  3. Upload in Step 1 on the PC Dashboard.
  1. Open Broad River Retail manifest. Ensure Route ID and core metrics exist.
    BRR example
  2. Remove extra summary rows; check date formats.
  3. Upload in Step 1 on the PC Dashboard.
This guide is up-to-date for Application Version 3.2.